10 Quick Tips to Learn How To Design For Print
As a professional graphic designer, you’ll soon learn that creating a print design is a whole other species than mastering a digital asset. There are complex differences at play that, if you don’t get right, can mean serious trouble down the line, resulting in print materials you cannot use, high printing costs, or a poor representation of your brand.
Stay on top of your game and learn to design print assets with the expertise you use to handle a digital canvas. In this article, we share ten tips to help you out.
1. Choose the right design program
As a digital graphics designer, you’re probably used to working with Adobe Illustrator or Photoshop. But print-based designs are mostly created on InDesign. It’s a popular tool among print designers for its wider range of custom-made features. Of all the Adobe Cloud software, InDesign is specifically made to create layouts for print materials such as brochures, magazines, flyers, business cards, and more.

It offers extensive typography and layout tools that you can use to create fresh designs, impressive layouts, and wow-worthy finished products.
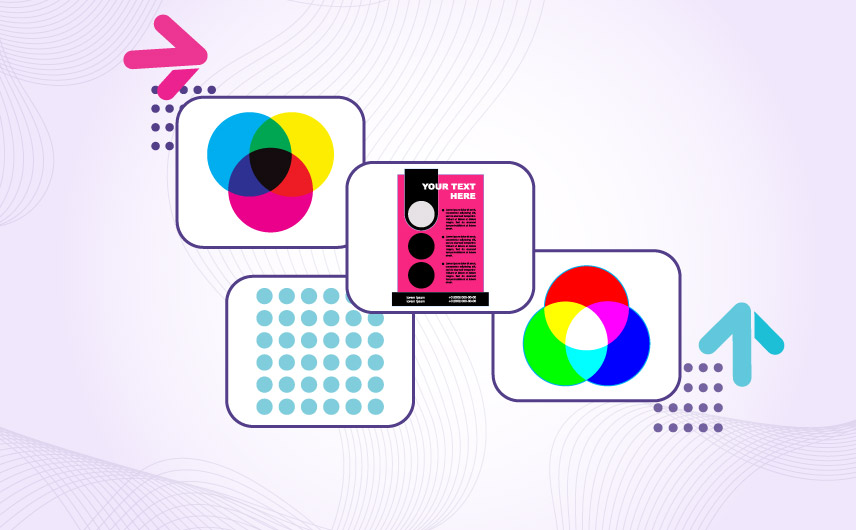
2. Design in the CMYK color mode
Always set up your design software to the CMYK color environment when creating a print design. Unlike a computer screen that starts black and requires the vibrant RGB mode to achieve a varied color palette, printing surfaces start white and need cyan, magenta, yellow, and black (also referred to as ‘key’ or K) to achieve proper color results.

Like no two computer screens are the same when displaying color, no two printers will give you the exact shade you chose in your design palette. So talk to your print specialist and ask them which ink cartridges they use. Print designers rely on Pantone color books to achieve consistency in color environments. But even those can vary depending on the type of paper you have used, its finish, weight, or any embellishments you have requested.
To learn more about colors and how they affect consumer perceptions, we’ve recently done an in-depth article so do take a look.
3. Design a prototype
Making any last-minute design changes to the entire print run can be immensely expensive. Bring that down by designing a prototype. Take a piece of paper and cut/fold it to the exact dimensions of your end product. Draw your design on it and see how the information flows. Keep making changes to it till the prototype gives you an exact reference point that you can take to the next stage of the process.

Whether you design and print a business card, a poster, or a brochure, having a physical mockup helps you understand the limits of design so you can make necessary changes to it in time.
4. Consider ‘safety’ and ‘bleed’ margins
Every print design utilizes three important margins to ensure the integrity of the design. These are:
- Safety margin: Essential elements and information within the design are kept safe within this area.
- Trim edge: This is where the printer will cut off the paper from all sides, giving you clean and polished borders.
- Bleed area: This extends 0.125 inches away from the trim edge. When you are designing, make sure that your design background extends to this line so your print specialist can perform their trimming with confidence.

When you set up your document’s size and spacing, consider these margins that go on all sides of the document. The standard bleed area is 1/8 inch from the trim edge, and whenever you set up document sizing, account for that in your trim and safety margins.
5. Design at 300 DPI
Before you take your design to print, make sure you’ve set its resolution at 300 DPI. This is the minimum standard to follow. A higher DPI will give you a higher image quality while a lower resolution will result in a badly pixelated image. DPIs refer to dots for inch. The more ink dots an inch of space has, the clearer the image will be.

While some print assets like a t-shirt print design might work on a lower DPI, why take that chance? Follow the 300-DPI rule for a sharp and crisp image on all of your branded print assets.
6. Apply consistent design styles
When you are creating a multi-page print design, such as a flyer, leaflet, or branding guide, ensure the consistency of design on every page. For example, using Paragraph Styles in InDesign helps you present your paragraphs in the same pattern throughout the document. With indentation, in a certain typeface, or a particular size.
Want to highlight a word throughout the document in a certain color, use Character Styles to do that.

Setting up these design styles early on in the process can save you a ton of editing later on. It also prevents any accidental inconsistencies in the design, with the software catching any errors you make and fixing them as you go.
7. Choose the right fonts
Digital design and print design both require the best font combinations, types, and sizes to create excellent work. But while a digital screen can be zoomed in and a disgruntled but committed user can still make the effort to see what your design has to say, a poorly-sized font on paper can render the entire design useless.
If people cannot read your poster from far away, what’s even the point of it?

Brand assets such as label designs and print assets like business cards, which always use smaller fonts, also need font types that are easy to read at small sizes.
8. Consider the paper quality and finish
How your print design will turn out depends a lot on the type of paper quality, weight, and finish you have chosen. Glossy papers are ideal when you are designing a magazine print. Flyers and posters also look their best in a glossy finish. A business card, on the other hand, can make your brand look really good with heavy paper and a bit of texturing on the surface.

These details not only make a sizable difference to your print costs and have a say in how your end product looks, but they may take longer to print.
So, before you make any final decisions, talk to your printer and work with them to choose what works best.
9. Print a final proof
Expanding on the previous point, take your files to the printer and ask them to print you a final proof. This will be a physical sample, allowing you to see your design in action, with all the color, font, image, and finish details in place.

Image Source: iStock/Filmstax
This print sample will help you spot any errors, fix anything weak, and finalize what works. After that, you can send the design for mass printing with full confidence.
10. Remember your printer’s turnaround time
Finally, remember that your print shop will likely have other orders to fulfill before they get to yours. They may also be low on the paper type or finish that you want. So keep in touch with them regularly and update them about a likely date you’ll send in all the files.
To make the best of it, talk to your printer before you start designing so you have a timeline idea to work with.
If this is your first time working with that print specialist, ask them what their average turnaround time is, so you can communicate any deadlines to your client accordingly.
Conclusion
As a newbie print designer, remembering all these details can be a bit tough at first. What will help? Noting things down. Collect some of your favorite print products ever. Posters, postcards, business cards, newsletters, anything that you like. Figure out if there are any themes or design details that you especially respond to.
Make a note of them, and try to incorporate them into your work. To become a proficient print designer, take more comprehensive design works where you are working with a brand for all of its branding — digital and otherwise.
Slowly it will help you develop workflows, best practices, and design standards to follow. Not for nothing they say that practice makes perfect, right?